Networking Basics - Certifications - Windows 7 - Windows 8 - Home Network Setup - Wireless Setup :: About - Contact - Search
How to configure Linksys Wireless Router
Configure your wireless router for setting up a wireless network
Part 4....
1.) Setup a Wireless Home Network Intro
2.) Devices needed for the Wireless Setup
4.) Configuring your home or business wireless home router (You are here)
5.) Configuring your Operating System:
- Windows XP
- Windows Vista
- Windows 7
- Windows 8
We will configure the wireless home router with different settings in order to have your wireless network setup done correctly.
It is assumed that you have read the previous sections that helped you decide where to place your router in your home and what devices you will need.
Check out the Linksys router from Amazon.com
Start configuring the wireless router....
I am using a Linksys router in this tutorial but this should work for most home routers.
I advice you that you read the manual for your router to familiarize yourself with the different settings that you can do.
Make sure your computer is set to Obtain an IP address Automatically.
Connect an Ethernet cable from the DSL or Cable modem to your computers Ethernet port.
You computer will grab some IP settings from the DHCP server that is running on your home router.
Below is a snapshot of the settings my computer grabbed

As you can see
My IP address is 192.168.1.101 (Class C Private IP)
Subnet Mask is 255.255.255.0
Default Gateway is 192.168.1.1 (this is the wireless home router's IP address)
The network address is 192.168.0.0 and broadcast address is 192.168.1.255.
If you have DSL Internet service then a PPPoE connection must be established. You can configure the router to initialize this connection. Follow this quick tutorial.
Now open your Internet browser (Internet Explorer, Mozilla Firefox, Google Chrome, Safari) and type the router's IP address at the address bar.
A login page opens up asking for the router's username and password. (Please check the manufacturer's manual for the default username and password)
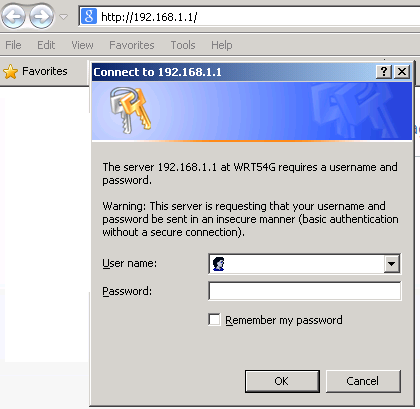
The Linksys router's login information is username :admin and password: admin. (We will change the password later on in this tutorial)
It is best practice to always change the default login for your home wireless router. Check this article on tips to securing your wireless network.
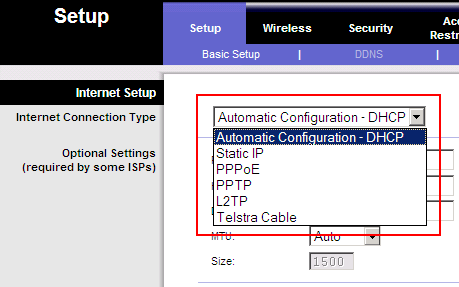
The first page to show up is the Basic Setup page.
Here you can choose between many options which I will explain more.
Automatic Configuration – DHCP - This is the setting that most cable modem users would choose. This option will allow the router to grab an IP address from the ISP.
Static IP - Choose this option If you are connecting through a static or fixed IP address from your ISP. This requires some configuration that is more advance.
PPPoE - This option is usually for DSL services. The ISP will provide you with the username and password needed to configure this option.
PPTP - Similar to PPPoE, Point to Point Tunneling Protocol (PPTP) is a service used in Europe only. If you are using a PPTP connection, check with your ISP for the necessary setup information.
L2TP - This option is also used in Europe for DSL users.
Telstra Cable: This option is used by DSL service accounts where the ISP provided the username, password and Heart Beat dedicated server information.
Network Setup
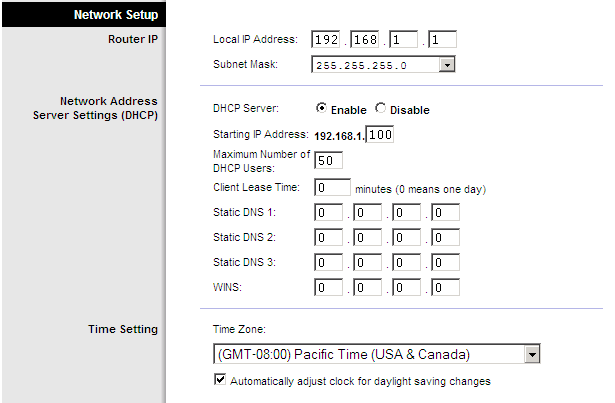
If you scroll down on the same page you will see the "Network Setup" section.
Router IP
Here you can configure the router's IP Address. If you want to change it to a Class A - or Class B address you can now. It is currently set to a class C address of 192.168.1.1 with a subnet mask of 255.255.255.0. This class will allow your network to have 254 hosts.
Network Address Server Settings (DHCP)
The DHCP Server is set to "Enable". I recommend you keep it like that unless you plan on running your own DHCP server on your network, in which case you would disable it here.
The starting IP address is set to 192.168.1.100. Any computer that connects to this router will grab an IP address from 192.168.1.100 to 192.168.1.254.
The maximum number of DHCP users let's you control how many available IP addresses you want on your network. It is set to 50 here so only 50 IP addresses will be handed out.
If you made any changes then make sure you click "Save Settings" at the bottom of this page.
Let's move to the next tap "Wireless"
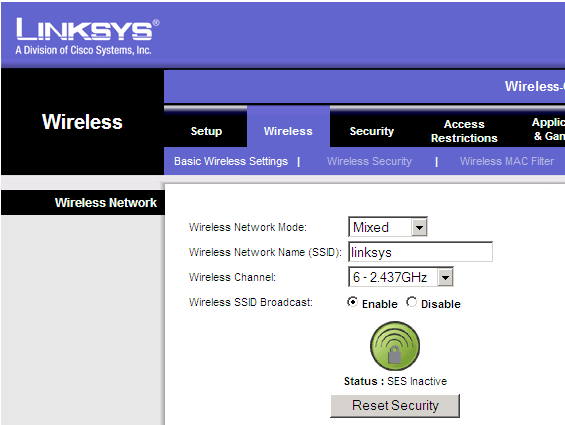
If you click the drop-down menu for "Wireless Network Mode", you can choose between "Mixed, B-only, G-only or N-only". This is used to make your network compatible with all Network standards. Leave it at "Mixed" to ensure all network devices that don't support Wireless-N can connect.
SSID
Where it says "Wireless Network Name (SSID)", you will type in the network name that your home wireless router will broadcast.
The SSID is the network name shared among all devices in a wireless network. Linksys recommends that you change the default SSID (linksys) to a unique name of your choice. My home network SSID is "-_-zZz"
Wireless Channel
The wireless channel is set to "6" by default. You can change this channel if your wireless network is showing interference with another wireless device like your neighbor's wireless router. It is possible that your neighbor is using the default channel of 6 also. All devices in your wireless network must use the same channel in order to function correctly.
Wireless SSID Broadcast
If you set this to "Disable" then your router will not broadcast the network name for computers to see it. This is a good security trick if you don't want your neighbors to know that you have a wireless router. The wireless signal is still being broadcasted but you won't be able to see the name. You would have to configure your computers manually with the settings.
note: There are many programs online that allow you to see wireless networks even if they are configured to not broadcast the SSID.
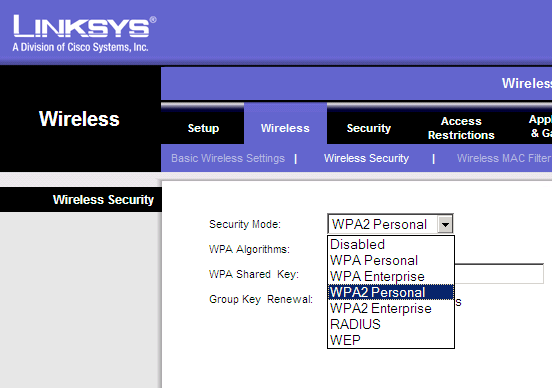
Next click the "Wireless Security" tab
You will notice the different choices for wireless security.
What ever you do, do not choose "WEP" or "Disabled".
Don't choose disabled as this will allow anyone to connect to your wireless signal. This will give them access to your local network and slow down your Internet speeds as the more users are connected to the router then the slower the speeds.
WEP encryption stands for "Wired Equivalent Privacy", but that's the problem it is not as secure as the name implies. Today you can download one of the many free hacking tools that can crack a WEP encryption password in minutes.
I recommend you choose WPA instead for your wireless security. After that you can type in a WPA shared key which is a passphrase that you will configure in Windows later on to connect.
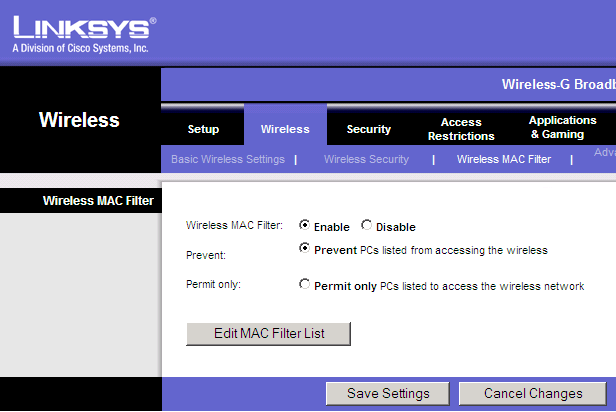
If you click the next tap "Wireless MAC filter", you can choose "Enable" and now control what devices can connect to your home wireless router by their MAC address.
This is a good security feature to use to ensure that no one connects to your home router even if they crack the password.
|
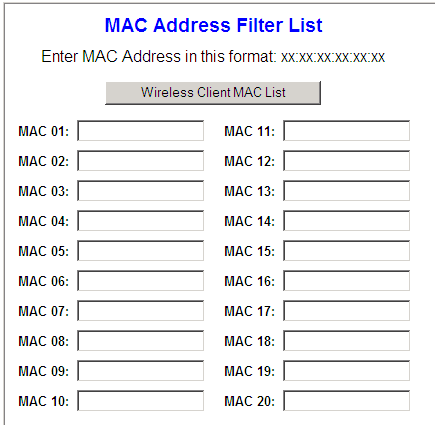
You can choose "Permit only PCs listed to access the wireless network" and then click "Edit MAC Filter List" In the image to the right you can see that I can configure up to 20 MAC addresses. If a computer's MAC address is not configured on this list then they won't be able to connect with my home router even if they have the correct password. |
 |
It is recommended to change the router's default password. Click on the "Administration" tab and next to "Router Password" type in a new password and click "Save Settings" in the bottom of this page.
Congratulations you have now configured your wireless router and are ready to configure Windows to connect to the router and access the Internet.
|
Return from Wireless Router to Set Up Wireless Network
Return from Wireless Router to homepage of Computer Networking Success
"Didn't find what you were looking for? Use this search feature to find it."

1



New! Comments
Have your say about what you just read! Leave a comment in the box below.