Networking Basics - Certifications - Windows 7 - Windows 8 - Home Network Setup - Wireless Setup :: About - Contact - Search
Windows 7 File Sharing Tutorial
Windows 7 file sharing is easy!
The easiest way to share something in Windows 7 is using the new Share With menu. You will see different options depending on the file you're sharing and the type of network your computer is connected to.
Some examples are - homegroup, workgroup, or domain. (Article on what is the difference between the three)
Learn what is a homegroup and how to set it up in this tutorial... (opens new window)
By default, password-protected sharing is turned on. In this tutorial we will turn it off in order to share files the simple way. You should not use simple file sharing on public networks like the airport, library, coffee shops, etc...
NOTE: I strongly recommend that you use this method only if your having difficulty sharing a specific file and want to only share it right there and then. Soon after you complete the task of sharing something, you should immediately turn password-protection back ON or not share the file at all. Please see my tutorial on password-protected sharing.
In this tutorial we will configure simple file sharing. (Username and password will not be necessary for authentication)
Let's ensure your network adapter is configure to share on the network
|
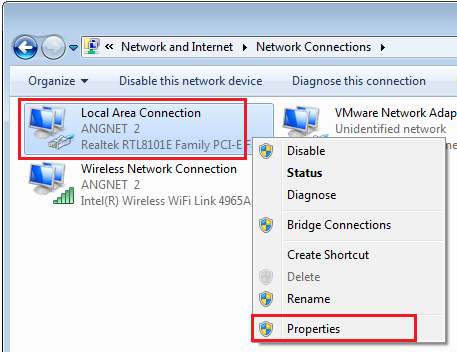
1.) Click Start > Control Panel > View Network Status and tasks > Change Adapter Settings The Network Connections window opens, right-click the network adapter (wired or wireless) and click Properties |
 |
|
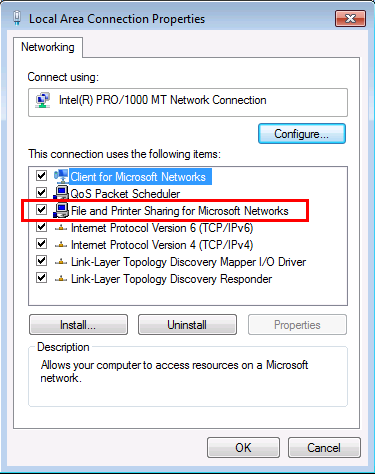
2.) Make sure that there is a check next to File and Printer Sharing for Microsoft Networks. It must be checked in order for file sharing to work on this adapter. |
 |
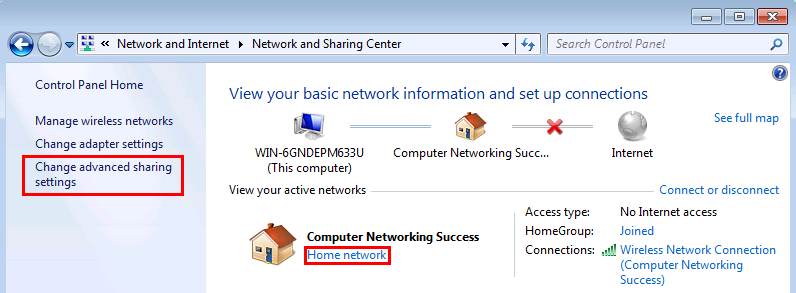
3.) Back on the Network and Sharing Center window, make sure the correct network location type is selected. This will allow your firewall settings to correctly allow file sharing. Mine is set to Home Network.
Also make sure that all computers have their own unique computer name and are joined to the same workgroup to avoid any conflicts later on.
NOTE: Enable Network Discovery to allow your computer to find other computers on the network easily.
4.) Click Change advanced sharing settings
|
5.) The Advanced sharing settings window appears, Locate your network type (home, work or public) and under File and printer sharing, Select Turn on file and printer sharing Under Password protected sharing, Select Turn off password protected sharing (this will allow other computers on the network to access shared files with authentication) |
  |
Now let's share a folder using the Share with menu.
NOTE: If you don't see the Share with menu, you might be trying to share an item on a network or other unsupported location. It also won't appear when you select files outside your personal folder.
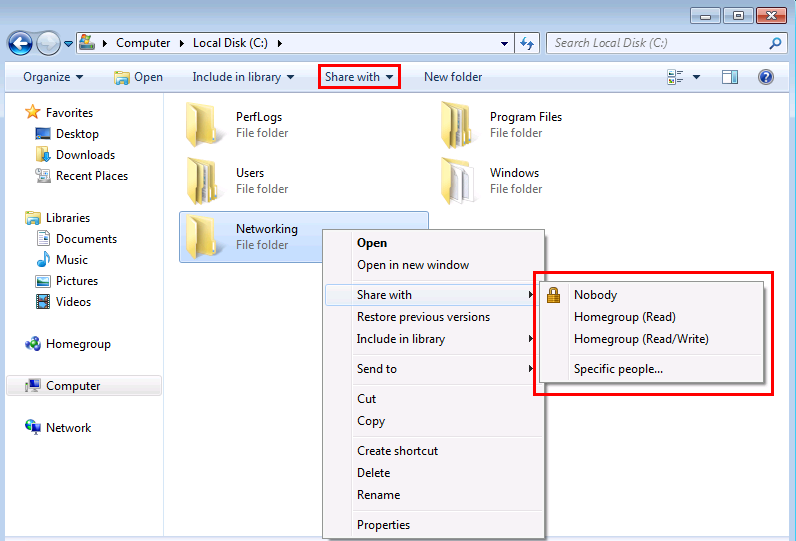
6.) Right-click the folder you want to share and select Share with. (There is also a Share with drop down window at the top of the menu bar)
You can choose one of the following options:
Homegroup (Read). This options shares the item with your entire homegroup—but only to open the item. Homegroup members can't modify or delete the item.
Homegroup (Read/Write). This option shares the item with your entire homegroup to open, modify, or delete the item.
Specific people. This option opens the File Sharing wizard, which allows you to select individual people to share items with.
7.) In this tutorial I clicked Specific people...
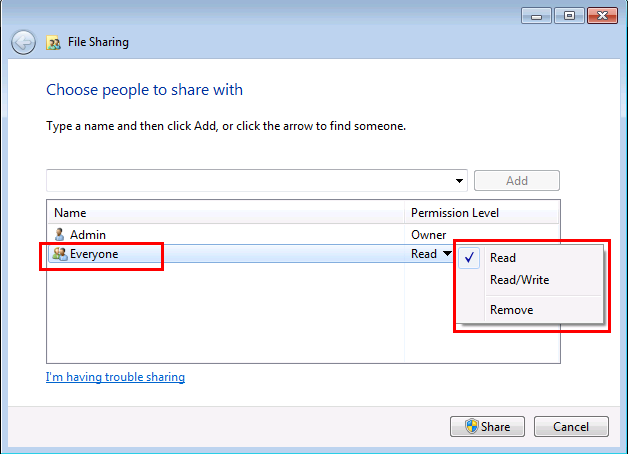
8.) The Windows 7 File Sharing wizard opens, type in the name of the user or group that you want to share the folder with.
I want to add the Everyone group. After typing the user or group name, Click Add
You can select the permission allowed to this user. Select Read only.
Read - Can open a folder or file but not can't modify or delete the file.
Read/Write - Can open, modify, or delete the file.
9.) When you are finished adding people then click Share. (If you are prompted for an administrator password or confirmation, type the password or provide confirmation. )
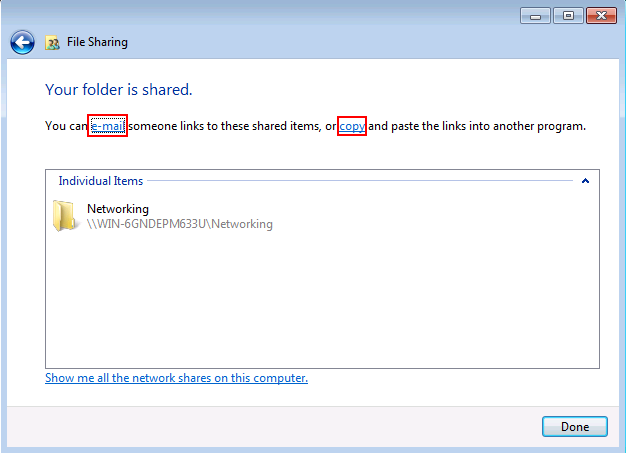
10.) In the next window, it is confirmed that your folder is shared. To let people know how to access the folder you can click e-mail to send someone a link to your shared folder or you can click copy to automatically copy the link to the Windows Clipboard. You can now paste it into your e-mail message, instant message or any other program.
Click Done
Almost done with this Windows 7 file sharing tutorial.....
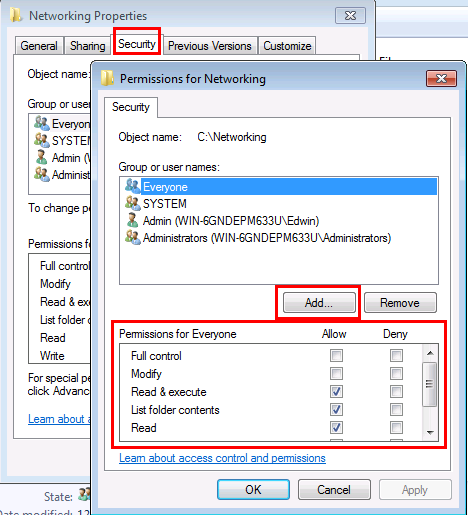
NOTE: You can change the permissions and who can access the shared folder by right-clicking the folder and clicking Properties.
Now click the Security tab and click Edit.
After the new window opens, click Add so you can allow access to other users and groups.
You can edit the Permissions for each user or group. Tick any permission to Allow or Deny.
Windows 7 file sharing is now complete. Enjoy!
Follow this link to learn how to access a shared folder or file on another computer.
Click here to return to the Windows 7 wireless network setup tutorial....
Return from Windows 7 File Sharing to Windows 7 Networking Tips
Return from Windows 7 File Sharing to homepage of Computer Networking Success
"Didn't find what you were looking for? Use this search feature to find it."

1


New! Comments
Have your say about what you just read! Leave a comment in the box below.