Networking Basics - Certifications - Windows 7 - Windows 8 - Home Network Setup - Wireless Setup :: About - Contact - Search
How To Configure Simple File Sharing in Windows XP
Simple file sharing in Windows XP is as it's name implies "simple". Once your computers are connected to your home wireless network, you can share your files and folders with any computers on the network.
Keep in mind that when you share files or folders, they are not as protected as they are when you do not share them. People who can access your computer or your network might be able to read, copy or change files that are in a shared folder. But don't worry I will show you how to configure each file or folder to keep it safe.
You can use the Network Setup Wizard to automatically turn file and printer sharing on and off. This works only if your computer is not joined to a domain.
To start the Network Setup Wizard:
- Click Start
- Click Control Panel
- The Control Panel window opens, now double-click Network Setup Wizard.
- Follow the instructions in the Network Setup Wizard and it will allow you to configure a new computer name, configure the workgroup name and it will enable file and printer sharing for you. The Windows Firewall will also be configured to allow file and printer sharing on your network for you.
But of course you want to do this yourself right? Where's the fun in networking if you let Windows do it all for you?
1.) Let's begin by changing your computer name and joining a workgroup. (All computers in your network must be joined to the same workgroup in order to share files without any issues.)
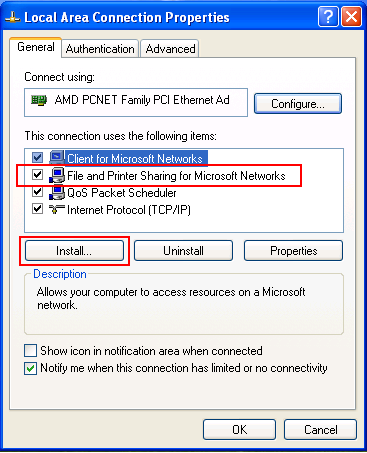
2.) Next, let's make sure that File and Printer Sharing for Microsoft Networks is installed on your network adapters.
The Local Area Connection Properties window opens.
|
|
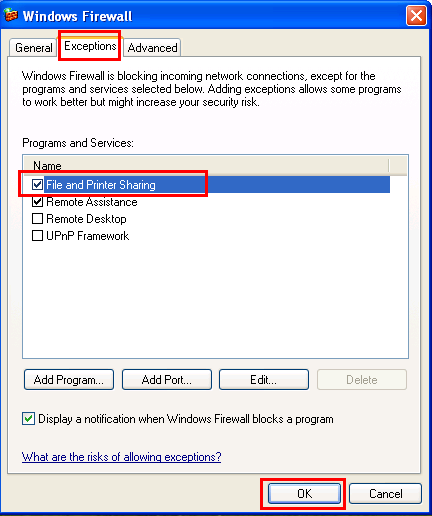
3.) Next, let's make sure that Windows Firewall allows File and Printer Sharing on your computer.
|
|
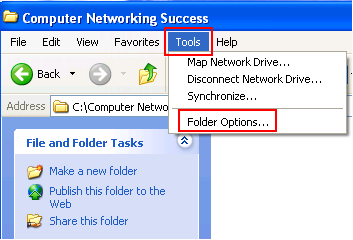
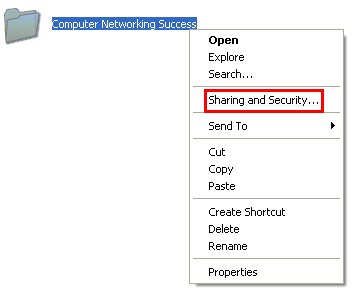
4.) Ok, let's choose a folder to share! Go to the folder you want to share and select Tools and click Folder Options. |
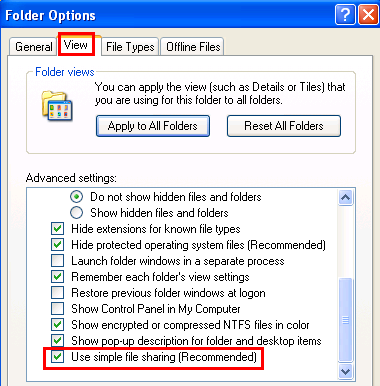
The Folder Options window opens, select the View tab and scroll down in the Advanced settings section and make sure that Use Simple file sharing (Recommended) is checked. Click OK.
|
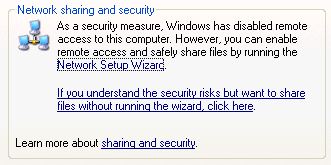
The folder properties window will open, if you have never ran the Network Setup Wizard, it will ask you to run it. Click "If you understand the security risks but want to share files without running the wizard, click here" option instead. |
|
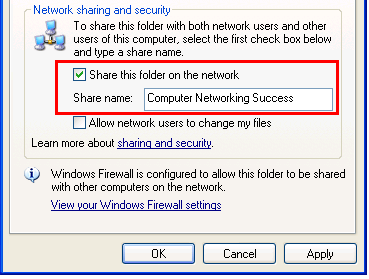
You can now add a check-mark to Share this folder on the network. Type in a share name. (This will not change the name of the folder on your computer.) Click OK Please Note: If you are logged on as a guest (a guest account provides access to the computer for any user who does not have a user account on the computer), you cannot create a shared folder. Please Note: The Sharing option is not available for the Documents and Settings, Program Files, and WINDOWS system folders. For security reasons, don't add a check to Allow network users to change my files, as this can be a vulnerability to your system. |
|
Now that you have shared your folder, you can tell when a folder is shared because it has a hand under the folder like this ------------->>>>>>>>> |
1 |
Hacker Tip!
You can access the C: drive on any computer on your network by going to:
1.) Start
2.) Click Run
3.) In the Run text box type \\(computer name)\c$
4.) You will be prompted with a username and password login for that machine.
Substitute "computer name" with the actual computer name of the computer you are trying to access. (You can also type in the IP address instead of the computer name)
In Windows XP, the C$ means it is a hidden share. By default Windows XP shares the C: drive as a hidden share. (Big security risk)
Note: When sharing folders or drives with Windows, if a dollar sign ($) character is added to the end of a share name, the share name does not appear in a browsed list of available shares on a computer.
You will now access the C: drive of that machine.
Hope you enjoyed this tutorial on Simple File Sharing!
Return from Simple File Sharing to Windows XP Networking Tips
Return from Simple File Sharing to homepage of Computer Networking Success
"Didn't find what you were looking for? Use this search feature to find it."

1







New! Comments
Have your say about what you just read! Leave a comment in the box below.