Networking Basics - Certifications - Windows 7 - Windows 8 - Home Network Setup - Wireless Setup :: About - Contact - Search
How to Share Printer in Windows 7
It's easier than you think to share printer in Windows 7.
There are 2 basic ways to make a printer available to the PCs on your home network.
- You can attach it directly to your computer on your network and share it with all the others on your network.
- Connect the printer as a stand-alone device on the network itself.
Let's share a printer on your home network!
Let's say you have a USB printer, you can only use one computer to print to it? Nope, you can share it through Windows and have other computers on your network print to it.
Note: The USB printer is available to all computers on the network as long as the host computer is powered on and connected to the network. If it is offline or turned off then the other computers on the network won't be able to print to the USB printer.
Thanks to a feature called HomeGroup in Windows 7, printer sharing is a breeze! Click here to set up HomeGroup!
HomeGroup automatically shares certain files and your printers.
Once you set up HomeGroup in Windows 7, let's connect to a share printer in Windows 7.....
or Share a printer manually....
or jump to How to share a printer manually...
How To Connect to a Shared Printer?
|
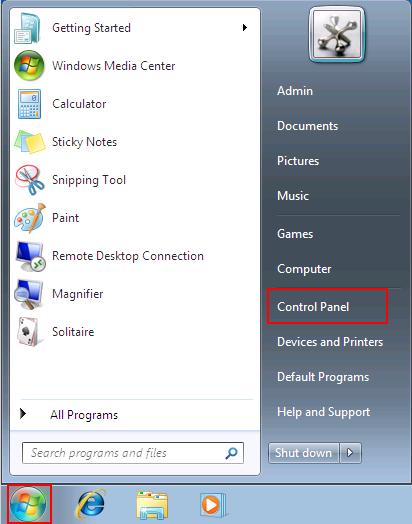
1.) On the computer the printer is physically connected to, click the Start button , click Control Panel. |
 |
2.) The Control Panel window opens, type homegroup in the search box, and then click HomeGroup.

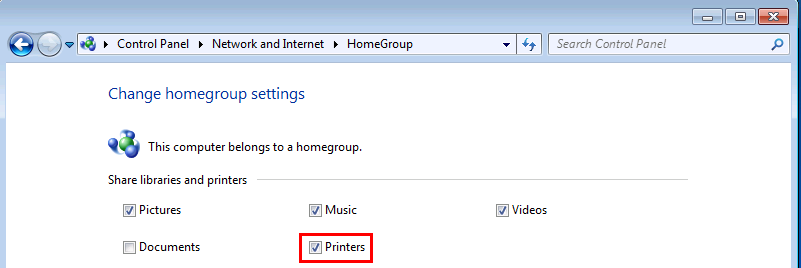
3.) HomeGroup window appears, make sure the Printers check box is selected. (If not, select it, and then click Save changes.)
4.) Next, let's go to the computer you want to print from.
Click HomeGroup and click Install printer.
Note: If you don't already have a driver installed for the printer, click Install driver in the dialog box that appears.
Note: After the printer is installed, you can access it through the Print dialog box in any program, just like a printer that's directly connected to your computer. The computer that the printer is connected to must be turned on to use the printer.
Network Printers
Network printers have a huge advantage over USB shared printers. They don't have to be connected to a computer. They are always available because they are connected to the wireless router through an Ethernet cable or using a built-in wireless adapter.
Wired printers have an Ethernet port, which you connect to your router or hub via an Ethernet cable.
Wireless printers typically connect to your home network using Wi-Fi or Bluetooth technology.
Some printers offer both options. The instructions that came with your model should tell you exactly how to install it on the network.
How to Share a Printer in Windows 7 Manually
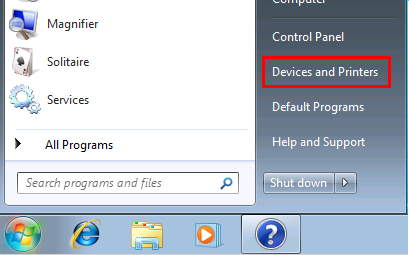
1.) Click Start, then click Devices and Printers.
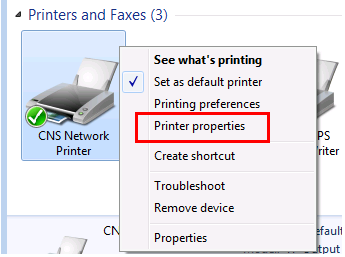
2.) The Devices and Printers window appears, right-click the printer you want to share and click Printer properties.
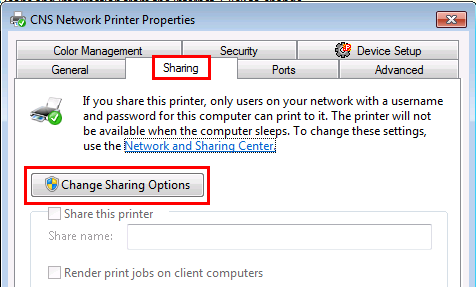
3.) The printer properties window opens, click the Sharing tab and click Change Sharing Options. (If it shows)
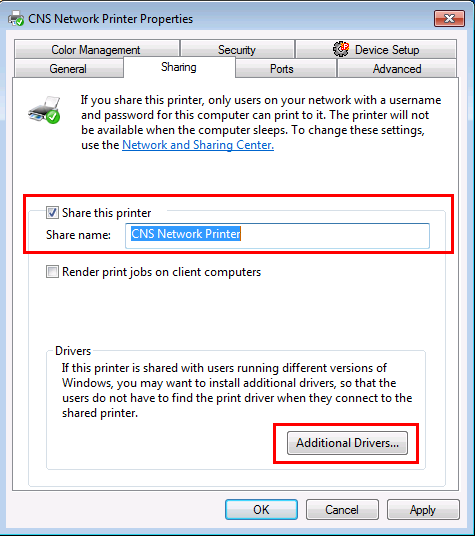
4.) Check Share this printer and type a Share name:
In my example, I named my share printer CNS Network Printer
Note: You can click additional drivers to install extra drivers for users that are running different versions of Windows. This way, if a Windows XP computer connects to this share printer, it will automatically provide them with the Windows XP driver.
5.) From another computer you can access this shared printer using HomeGroup on a Windows 7 PC. If you are using Windows XP, you can go to the run command and type \\IP address\share name.
For example: The computer that is sharing my printer has an IP Address of 10.0.0.32. So I would type on the run prompt: \\10.0.0.32\CNS Network Printer
"CNS Network Printer" is the share name I typed when setting up the printer earlier on step 4
Click here to go back to the Windows 7 Wireless set up tutorial...
Return from Share Printer in Windows 7 to Windows 7 Networking Tips
Return from Share Printer in Windows 7 to homepage of Computer Networking Success
"Didn't find what you were looking for? Use this search feature to find it."

1



New! Comments
Have your say about what you just read! Leave a comment in the box below.