Networking Basics - Certifications - Windows 7 - Windows 8 - Home Network Setup - Wireless Setup :: About - Contact - Search
Setting Up an Ad Hoc
Wireless Network in Windows Vista
To create an ad hoc wireless network in Windows Vista you will need to configure Internet Connection Sharing first to allow other computers in your network to access the Internet.
If you don't have a router or access point in your home network it is a good idea to set up an ad hoc wireless network.
If you want to buy a new wireless router, check out this really good one from amazon.com. It has 1000's of Great ReviewsAn ad hoc network will allow you to connect your computers wirelessly and share you Internet. This can also allow you to share your files and home printer. The computers and devices in ad hoc networks must be within 30 feet of each other.
Let's first start by enabling Internet Connection Sharing (ICS) on the host computer.
How to Enable Internet Connection Sharing (ICS) in Windows Vista
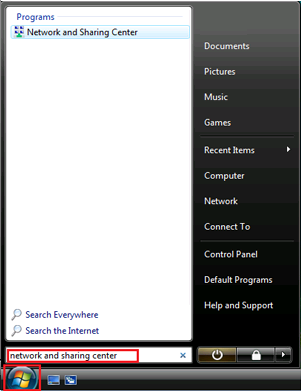
1.) Click the Start Icon in the bottom left of the taskbar. Type network and sharing center and click Network and Sharing Center under Programs.
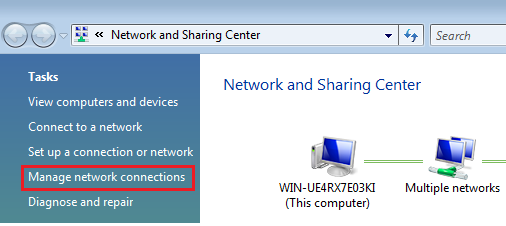
2.) The Network and Sharing Center window opens, Click Manage network connections
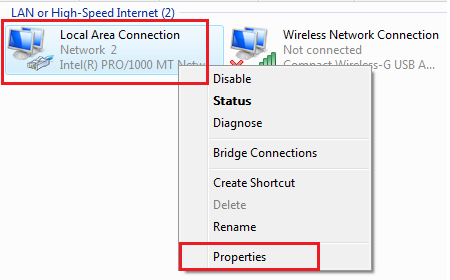
3.) The Network Connections window opens, right-click Local Area Connection (this is the Ethernet adapter that is connected to the Internet) and click Properties
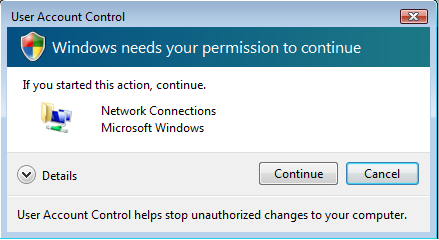
4.) The User Account Control prompts asking you for permission to proceed. Click Continue
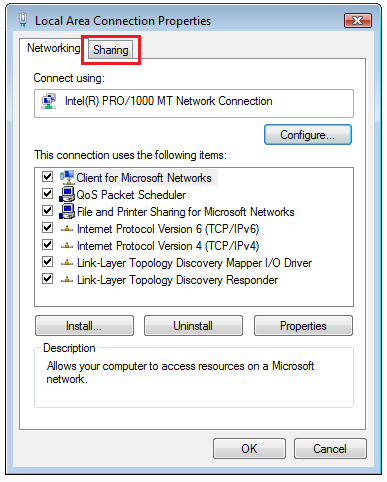
5.) The Local Area Connection Properties window opens, click the Sharing tab.
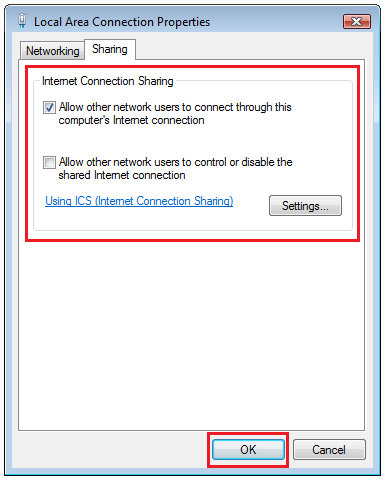
6.) Under Internet Connection Sharing, click to check the Allow other network users to connect through this computer's Internet connection
Click OK
Set up an ad hoc wireless network in Windows Vista
Let's create the ad hoc network now to allow other wireless computers access to your Ad Hoc. This will allow them to access the Internet along with your shared files and home printers.
Here's a different way to get to the Network and Sharing Center window like we did earlier in this tutorial.
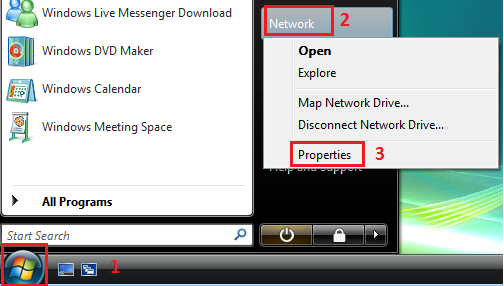
1.) Click the Start icon located on the bottom left corner of your taskbar.
Right-click Network and click Properties
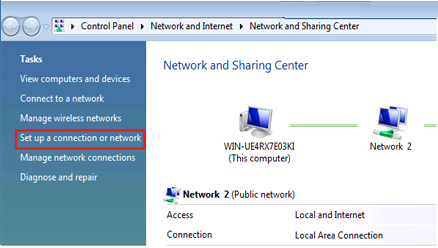
2.) The Network and Sharing Center window opens, click Set up a connection or network
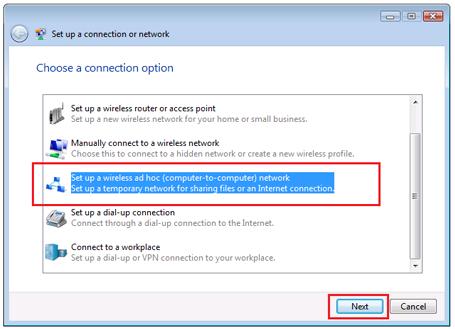
3.) New window opens, click Set up a wireless ad hoc (computer-to-computer) network
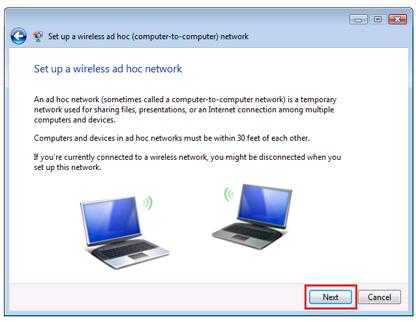
4.) The next window explains to you a little more what an Ad Hoc Wireless network is.
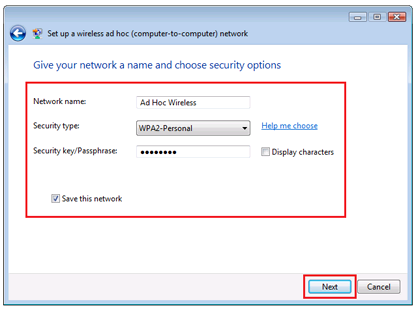
5.) In the next screen we will configure the network name and security type along with the security key you want to use.
Network name: type in the name of the Ad Hoc Wireless network for your home. I called my network "Ad Hoc Network"
Security type: You can choose between No Authentication (Open) which is not recommended, you can choose also WEP or WPA2-Personal. I strongly recommend you choose WPA2-Personal. A WEP key is very easy to crack with many simple hacker software that you can find online. (Don't recommend you try to crack anything)
Make sure Save this network is checked.
Click Next
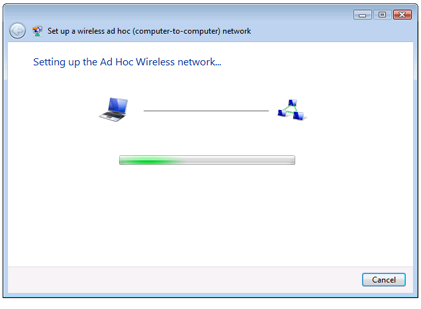
6.) Your computer will now create the Ad Hoc Wireless Network.
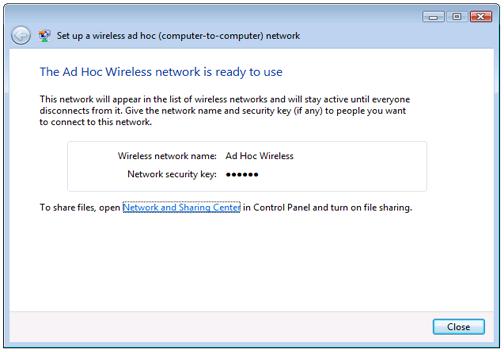
7.) A confirmation of your new Ad Hoc network tells you that it is ready to use.
How to connect other computers to your Windows Vista Ad Hoc Network
Your other computers must have a wireless network adapter in order to see the Ad hoc connection and connect to it.
Also make sure that your computers are set to "Obtain an IP address automatically" if you will be sharing your Internet.
Click here for a quick tutorialRemember that you will use the ad hoc connection to share your Internet, files and printers. If you have a wireless access point or router then I recommend you use that instead of an ad hoc connection.
A wireless router will allow more computers to connect to your network. It will provide way faster speed and range along with better security.
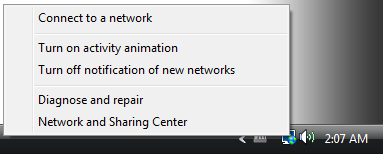
1.) Right-click the wireless connection icon on the bottom right of the system tray on the desktop
Click Connect to a network
2.) Select your new Ad Hoc Network and click connect.
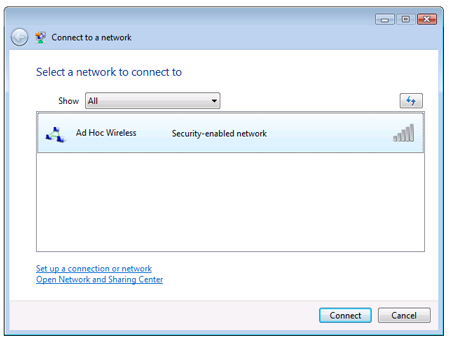
3.) It will prompt you to type in the WPA2-Personal password key that we created earlier. Type it in and connect.
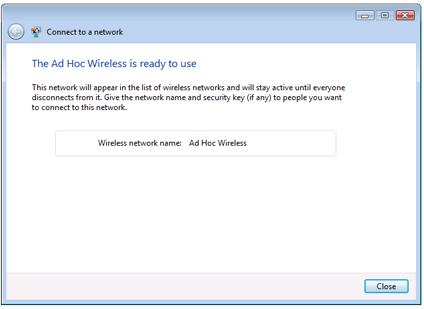
4.) Finally you are connected to the Ad Hoc Network.
Test your Internet connection by going to a website using your favorite browser. (Firefox, Chrome, Internet Explorer)
Return from Ad Hoc Wireless Network In Windows Vista to Set Up Wireless Network
Return from Ad Hoc Wireless Network In Windows Vista to homepage of Computer Networking Success
"Didn't find what you were looking for? Use this search feature to find it."

1


New! Comments
Have your say about what you just read! Leave a comment in the box below.