Networking Basics - Certifications - Windows 7 - Windows 8 - Home Network Setup - Wireless Setup :: About - Contact - Search
How to Create an Ad Hoc
Network in Windows 7
To create an ad hoc network in Windows 7 you will need to configure Internet Connection Sharing first to allow other computers in your network to access the Internet. This set up is useful when you don't have a router or access point in your home network.
An ad hoc network will allow you to connect your computers wirelessly and share you Internet along with your files and printers.
If you're in search for a new wireless router, I recommend this one from Amazon.comLet's first start by enabling Internet Connection Sharing (ICS) on the host computer.
How to Enable Internet Connection Sharing (ICS) in Windows 7
1.) Click Start icon on the bottom left corner of the taskbar.
Click Control Panel
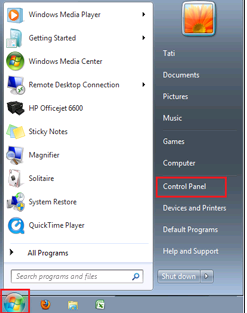
2.) Control Panel window opens, Click View network status and tasks
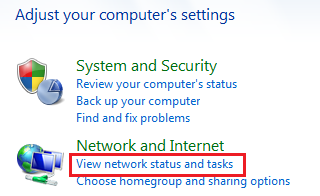
3.) The Network and Sharing Center window opens, click Change adapter settings
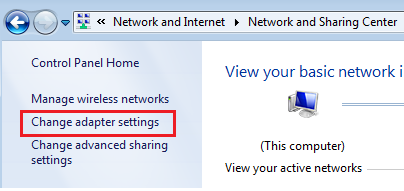
4.) The Network Connections window opens, right-click the Local Area Connection (this is the Ethernet adapter that is connected to the Internet) and click Properties
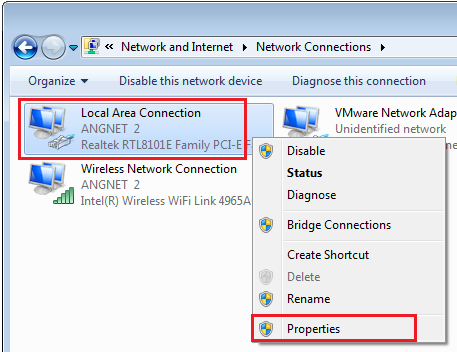
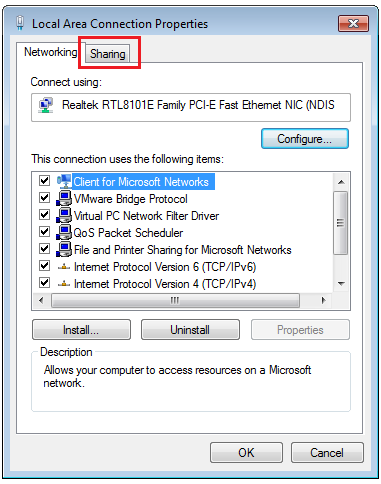
5.) The Local Area Connection Properties window opens, click the Sharing tab
note: the Sharing tab won't be available if you have only one network connection.
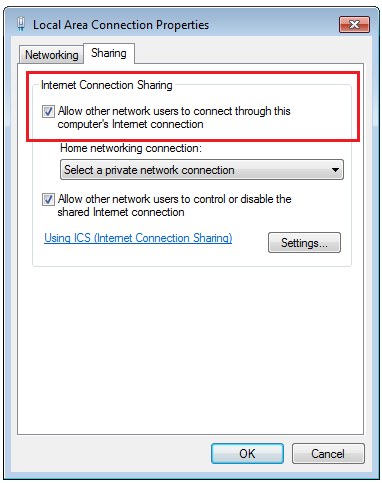
6.) Under Internet Connection Sharing, select and check the Allow other network users to connect through this computer's Internet connection
Click OK
Set Up An Ad Hoc Network in Windows 7
This ad hoc wireless network that you will create will allow other computers in your network to connect wirelessly to this computer and share the Internet along with your files and printers.
1.) Click Start icon on the bottom left corner of the taskbar.
Click Control Panel

2.) Control Panel window opens, Click View network status and tasks

3.) The Network and Sharing Center window opens, click Set up a new connection or network

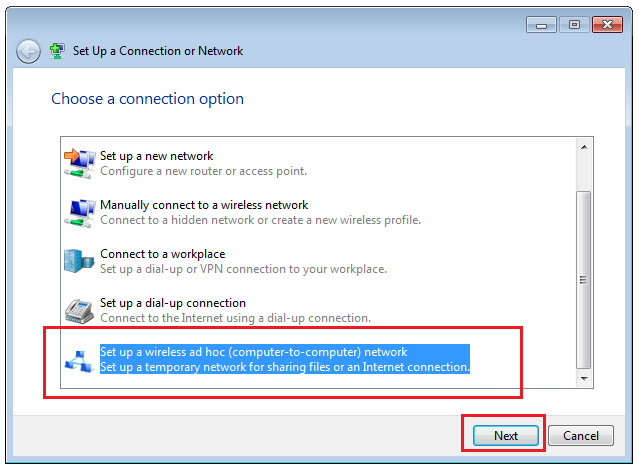
4.) Select Set up a wireless ad hoc (computer-to-computer) network and click Next
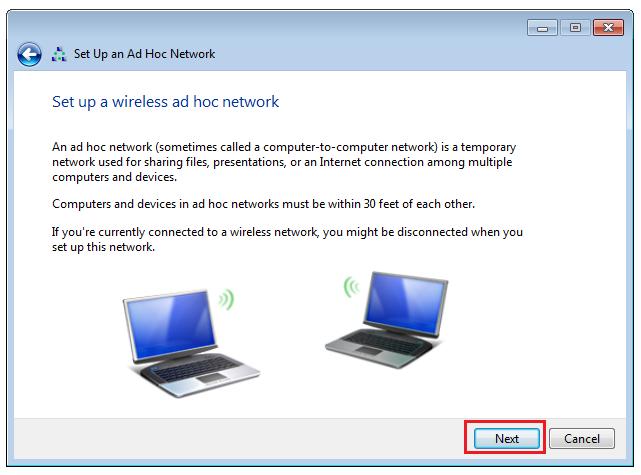
5.) Read about an ad hoc network and click Next when you're ready
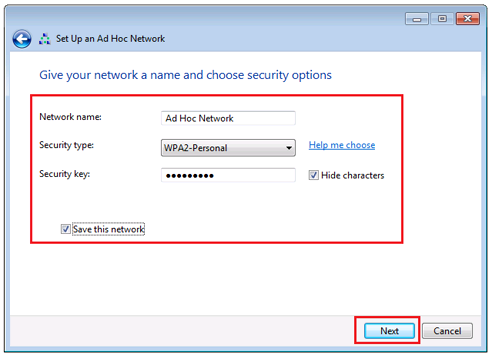
6.) Give your network a name and choose security options.
Next to Network Name: type a name for the new Ad Hoc Network. (I named mine "Ad Hoc Network")
Next to Security type: You can choose between:
- No Authentication (Open)
- WEP
- WPA2-Personal
Choose WPA2-Personal as this is the more secure configuration.
Next to Security Key: Type in a password (You will need this password key to connect to the ad hoc network from another computer)
Make sure you have the Save this network checked.
Click Next
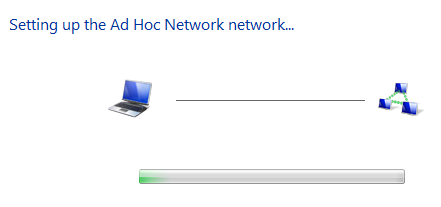
7.) The next window shows that the Ad Hoc Network in Windows 7 is setting up.
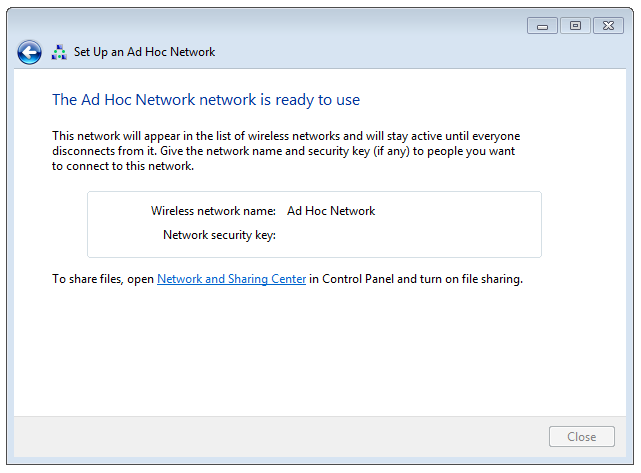
8.) Finally, the Ad Hoc Network network is ready to use.
How to connect your other computer to the Ad Hoc Network in Windows 7
Your other computers must have a wireless network adapter in order to see the Ad hoc connection and connect to it.
Also make sure that your computers are set to "Obtain an IP address automatically" if you will be sharing your Internet.
Click here for a quick tutorialRemember that you will use the ad hoc connection to share your Internet, files and printers. If you have a wireless access point or router then I recommend you use that instead of an ad hoc connection. A wireless router will allow more computers to connect, way faster speed and range along with better security.
1.) Click the wireless connection icon on the bottom right of the system tray
A list of near-by wireless connections appear including the new Ad Hoc Network.
Select the new Ad Hoc Network and click Connect
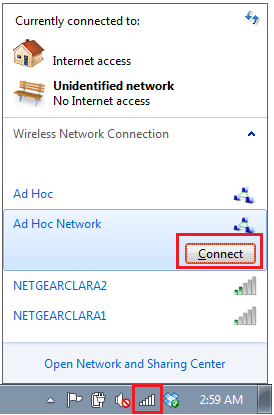
2.) It will ask you for the network key (password). Type in the password and the computer will start connecting to the Ad Hoc Network.

3.) You are now connected to the new Ad Hoc Network. Test your Internet connection by going to a website using your favorite browser. (Firefox, Chrome, Internet Explorer)
Return from Ad Hoc Network In Windows 7 to Set Up Wireless Network
Return from Ad Hoc Network In Windows 7 to homepage of Computer Networking Success
"Didn't find what you were looking for? Use this search feature to find it."

1


New! Comments
Have your say about what you just read! Leave a comment in the box below.