Networking Basics - Certifications - Windows 7 - Windows 8 - Home Network Setup - Wireless Setup :: About - Contact - Search
Network Router Configuration for a Home/Office Network
Continue setting up your home network with the configuration of the network router.....
1.) Intro >
2.) Network Devices >
3.) Home Network Wiring Cable Modem or DSL Modem>
4.) Home Router Configuration (you are here)>
5.) Windows Configuration
In this tutorial you will learn how to configure a home router for a wired home network.
When setting up a home network you have to consider where you put the router.
The network routerAs the DHCP server, it will hand out IP addresses to all computers on your network in order to communicate.
|
I will use a Linksys Cable/DSL router Model #: BEFSR41 in this tutorial. - - - - - - - - - - - - -> |
This router does not support wireless.
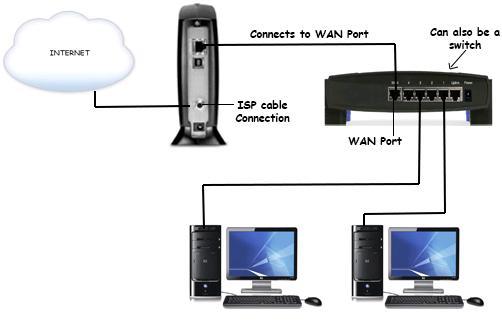
The Linksys router will connect to your DSL or Cable modem using an Ethernet Cable.
Similar to this diagram.....
Before you start connecting cables, connect an Ethernet cable from your computer to the modem's Ethernet port and verify that you have Internet access by browsing to a webpage. After you have verified Internet access you can then continue this tutorial.
Just like in the diagram above, connect an Ethernet cable from the Cable or DSL modem's Ethernet port to the Linksys "Internet Port".
Note: (For a quicker configuration, connect an Ethernet cable from the modem's Ethernet port to one of the four ports (not Internet) on the Linksys. This will give Internet access to any computer that is connected to the Linksys router)
That easy installation is worth it if you don't want to configure the router and need Internet access right away. The problem is that you can just purchase a switch and accomplish this without wasting the Linksys router's potential. This Linksys router has a 4-port built-in switch.
You will see the many configuration options that are available by using the full potential of your Linksys router. The security that comes with this network router is enough to convince you to use it correctly, especially if you have an office network and need network security.
Lets begin configuring the home router...
1.) Verify that your computer is set to "Obtain an IP address automatically". (This is important to ensure your computer grabs a correct IP address from the Linksys router).
2.) Your computer should grab the IP settings from the Linksys router. (If note, then press and hold the little reset button (located in the back of the Linksys router) for about 30 seconds.) This will set the router to its factory defaults and DHCP should be enabled.
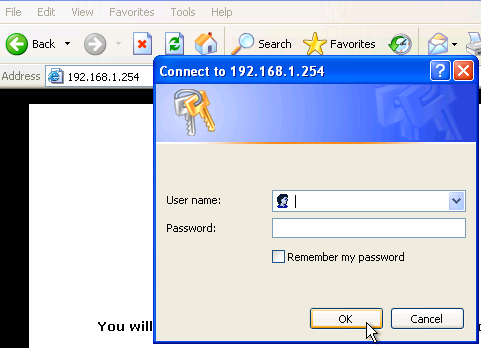
3.) Go to a browser and type the IP address of the network router in the address bar. (My Linksys router has an IP address of 192.168.1.254, please refer to your own router's manual to find the default IP address)
4.) When you type the IP address in the address bar, the router's login shows up.
5.) Type in the username and password of "admin" if your using a Linksys router. (Refer to the user's manual for the default username and password for your router)
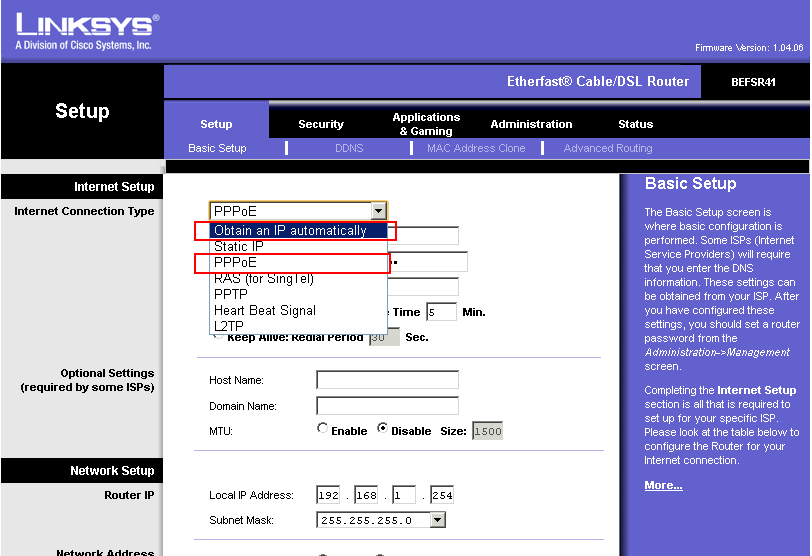
If your using a cable modem, then leaving "Obtain an IP automatically" will allow your network router to connect to the Internet.
If you are using DSL, then you will need to configure PPPoE. (opens the tutorial in a new window)
Network Setup
Router IP - This is the IP address of the router. If you leave the subnet mask to 255.255.255.0 then you can change the last octet of the Router IP to anything from 1 to 254. With a subnet mask of 255.255.255.0 you must keep the first octets of 192.168.1 always.
ie: the router IP can be:
- 192.168.1.1
- 192.168.1.2
- 192.168.1.3
- and so on until 192.168.1.254.
If you have cable or DSL service at home, your modem has a static WAN (Wide Area Network) IP address. This address is provided by your ISP and you can't change it. It is also called a public IP address because it is the address that is seen on the Internet.
The Linksys router however has a local IP address and because of a protocol called NAT (Network Address Translation) it is hidden from the Internet.
It is like if it has a double identity. On the Internet, the IP that is seen communicating from your home network is the public IP provided by the ISP and inside your own private network the local IP address is used.
So this means that in all the private networks in the world, users can use the same IP as 192.168.1.1 because it is never exposed on the Internet, thank to NAT.
There can't be two network devices with the same IP in any network ever!
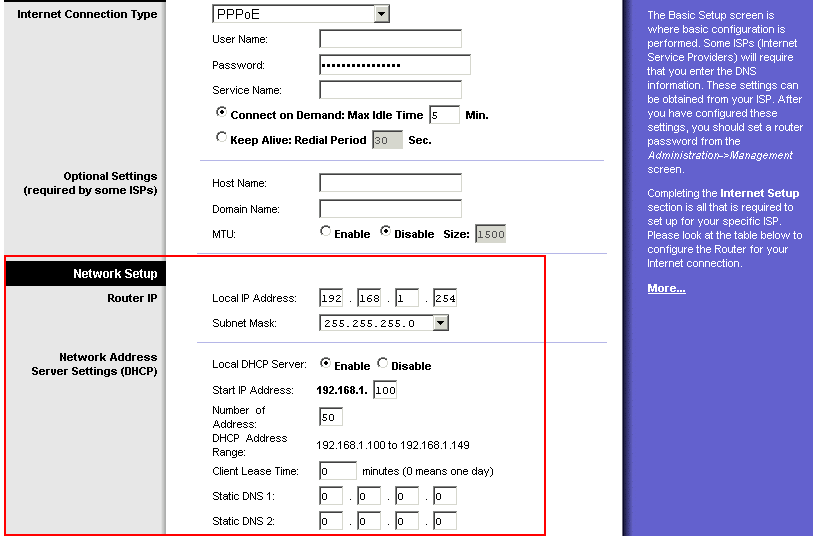
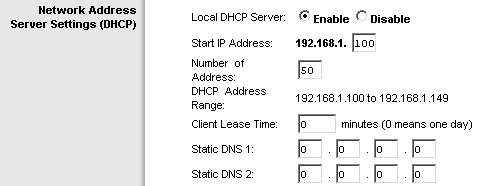
As you can see below....the "Local DHCP server" is set to "enable"
The "Start IP Address" is configured to start at 192.168.1.100. So every computer that connects to the home Linksys router will grab an IP from the range of 192.168.1.100 to 192.168.1.254.
The "Number of Address" is set to 50. This means that a max of 50 IP addresses can be leased. You can change this number to allow the router to give out more IPs depending on how many network devices will be on your private local network.
The "DHCP Address Range" shows the range of the possible IPs that a computer can grab on your home network.
This can be used as a security strategy.
If you plan on only having 4 computers in total on your home network, then you can set the "Number of Address" to 4 and the "DHCP Address Range" would be from 192.168.1.100 to 192.168.1.103 for a total of 4 IP addresses. No other unauthorized computer would gain access to your network since all possible IP addresses would already be in use.
Congrats!
You have finished setting up a home network (wired).
You should be able to connect any computer using an Ethernet cable to one of the available Ethernet ports on the Linksys router and automatically grab a local IP address.
If you connect a switch, you will extend your network with extra Ethernet ports and this will allow you to add more than 4 computers.
Return from Network Router to Setting up a Home Network
Return from Network Router to homepage of Computer Networking Success
"Didn't find what you were looking for? Use this search feature to find it."

1


New! Comments
Have your say about what you just read! Leave a comment in the box below.